Skip to content

Sri Lankan Fish “Stew”

On bleak and chilly days, before the Spring, and before the Spring-runs of salmon – which is generally when we’re craving it most we buy a frozen salmon fillet and this is one of our favorite ways to prepare it.  (The salmon remains tender, succulent, moist – if you hadn’t bought it yourself, you wouldn’t know it was frozen.) This dish is savory, sour-sweet (thanks to the tamarind),  warmly and mildly spicy, and coconut-milk-creamy…and, as a bonus, it’s an incredibly healthy meal.

A note on the SPICES:  (I like to use whole seeds when I can, and dry-roasting them brings out their “sweetness” and adds another dimension of flavor to a dish. Besides that, spices you buy already-ground have started to lose some of their potency by the time they make it to your spice cupboard. But if you don’t want to make the purchase and you already have the ground spices on hand, by all means, simply cut in half the quantity of seeds specified below as your guide.)

Sri Lankan Fish Stew

(this should serve at least 4)

  • 2 Tablespoons coconut oil
  • 1 yellow onion, chopped
  • 3 cloves garlic, minced
  • 1 teaspoon coriander seeds
  • ½ teaspoon cumin seeds
  • ½ teaspoon whole peppercorns
  • ¼ teaspoon fennel seed
  • ½ teaspoon cayenne pepper
  • ½ teaspoon ground turmeric
  • 1/8 teaspoon ground cinnamon
  • scant 1/8 teaspoon ground cloves
  • 3 Italian plum tomatoes chopped (+ 1 more for garnish, or cherry tomatoes, chopped)
  • 1 can unsweetened coconut milk (13½ ounce or 420 ml)
  • 1 Tablespoon tamarind paste, dissolved in 3 Tbl. warm water
  • 1¾ teaspoon teaspoon sugar
  • salt (to taste)
  • 2 pounds (1 kg) salmon (halibut, or sea bass fillets)
  • small bunch cilantro leaves, torn – as garnish
  • Cooked rice, to ladle the stew over. (Basmati is wonderful with this.)

Drop the coriander, cumin and fennel seeds, along with the peppercorns, into a small skillet, using no oil. Place over medium heat and toast the seeds & peppercorns until seeds have begun to release their aroma and have turned a toasty brown, stirring or shaking the pan often. Remove the skillet from the heat and allow to cool for just a minute then grind finely with mortar and pestle or in a spice grinder.

Measure out the other spices and have them ready to add all at once.

Cut the tomatoes in half crosswise – squeeze and shake over sink to release most of their seeds. Then chop.

Read more

a soup to carry you through winter

What’s to like about winter? A low-slung sun. A bluer sky than blue. The last golden leaves to cling. Grass  that crunches under foot. Children’s boots and mittens.  Hot cocoa. The glow of candles near your bath. Longer hugs. And soup.

This is winter’s version of pistou, a Provençal vegetable soup, and I believe it is very possibly the finest winter soup I’ve ever made. It is, in fact, so fine a soup I’m going to be adapting it to different  kitchens and circumstances. (Slow-cooker and pressure cooker versions will follow before winter’s done with us.) It’s gob-full of vegetables, heavenly hearty, and will warm you to your chilly toes.

This makes an enormous potful. We took half out to our mom and the half we have remaining is enough to feed a table full. There’s quite a bit of chopping involved, but sharpen your knife and trust me…it will be so worth your time.

WinterProvencalVegetableSoup-7

_____

Provençal Vegetable Soup

_____

Extra-virgin Olive Oil – 5 Tablespoons

3 plump, moist Garlic cloves

Onions 4 medium, cut in ½ – 1-inch pieces

Leeks – 3 medium, white & tender green parts only, rinsed, quartered & thinly sliced

Bouquet Garni: several fresh or dried bay leaves, fresh celery leaves, thyme sprigs & parsley – either tie together or put in a wire mesh tea strainer

sea salt

Carrots – 8 medium, scrubbed & cut into thin wheels

firm, yellow-fleshed Potatoes (Yukon Gold) – 1 lb. (500 g)  peeled & cubed

Celery ribs – 4 ribs with leaves, cut into thin pieces

Butternut Squash or raw Pumpkin – 2 lbs. (1 kg), peeled & cubed (yield: 1 qt. or 4 c.)

Farro or Spelt – or substitute Barley – 1 cup, rinsed & drained

can peeled Italian plum Tomatoes in their Juice – 28-ounce (750 g) can

Tomato Paste – 2 Tablespoons

small White Beans – such as navy or flageolet (see NOTE)

Cranberry Beans (such as Borlotti) (see NOTE)

mixture chopped Kale & Spinach *

freshly-ground coarse Pepper

freshly-grated Pecorino Romano cheese – ¾ cup

freshly-grated Parmigiano-Reggiano cheese – ¾ cup

_________

NOTE: If using fresh beans, 1 pound of each in their shells. If using dried beans, 8 ounces (250 g) of each  – pick them over, making sure you have no little pebbles, rinse the beans, place in a large bowl & cover with boiling water;  allow to soak for 1 to 2 hours. Please note the different instructions – step 2 below – based on whether fresh or dried beans are used.

* – a bag of frozen chopped kale & spinach works great for this. Add as you’re ready to serve – each time you heat up a new potful of soup, add a handful or 2 of this mixture and you’ll have bright green in each bowl.

_______

WinterProvencalVegetableSoup-1

1. In a large, heavy-bottomed stockpot, combine the oil, onions, leeks, bouquet garni and salt to taste,  then stir to coat. On low heat, sweat the onions & garlic mixture – cooking with the lid on for several minutes until what’s in the pot is softened and fragrant. Drop in the carrots, celery, squash, potatoes, farro (or spelt or barley), the tomatoes with their juice, along with the tomato paste. Add four quarts (4 liters) cold water. If you are using DRIED BEANS – add only 3 quarts cold water at this time. Cover the stock pot and bring to a simmer. Gently simmer for 30 minutes. Taste for salt & add as needed.

WinterProvencalVegetableSoup-4

Read more

what? another take on hummus?

We have this favorite little Japanese maple out back. This past week, its finely pointed leaves began to wave then drop in sweet clusters of beet red.

It was quite impossible to say no to the urge that hit me…so,  with that…Wegetable Vednesday makes a comeback!

BeetBelugaLentilHummus-8

With the crimson and scarlet, burnt orange, rust and gingko gold of fall flying,  suddenly I craved the taste of color.

BeetBelugaLentilHummus-1

I’m in school and everything I do in the  kitchen for months will need to be simple. So, for a while simple is all I have to offer you.

…and a hope and a toast to your very good health!

__________

(Though the following recipe calls for black beluga lentils, they may be somewhat difficult to find. You can order on line if you like, or substitute with small, dark green Puy Lentils. Both these varieties will make a more luxuriously textured and  dramatically colored hummus.)

_______

Red Beet & (Black Beluga) Lentil Hummus

 Black  Beluga Lentils, rinsed – ½ cup

2 medium Beets or 3 small – peeled and cut into chunks

garlic – 2 cloves, peeled

Tahini Paste – 2 Tablespoons

Olive Oil – 2 Tablespoons

Fresh Lemon Juice – 2 Tablespoons

Lemon Zest – 2 teaspoons grated (minimum)

sea salt – 1 teaspoon (to start)

__________

NOTE: Sometimes lentils off the shelf are rather old and will benefit from a little soaking. Nothing extravagant here, but it wouldn’t hurt to allow them to soak an hour or two before draining and cooking. If your package says no need to soak, then no need to soak.)

BeetBelugaLentilHummus-13

Rinse the lentils and add to a medium size pot. Peel the beets and cut into chunks about 1½ inches in size. Add to the pot with the lentils and add 1 cup of water. Bring to boil and reduce temperature to simmer. The beets should be fork tender and the lentils soft when done.  (About 20 minutes or so.) Read more

crêpes au chocolaté

As full as life is these days, I didn’t want to miss the opportunity to share a special treat that a MOM might like. Besides, I promised a mom I would.

I’ve shared another crêpe recipe with you previously (“plain,”  yet not-so-plain, and simply wonderful) – partly because of its versatility, savory or sweet, it remains our favorite.

Don’t misunderstand – today’s crêpe is no slouch! And it steps in to fill the cockles of a chocolate-lover’s heart…it  might even be the one to make a Mom or Grandma swoon….if you aim for that sort of thing.

__________

With a plateful of warm crêpes of chocolate, you’ll be faced with choices…What to pool inside? What to dribble over?

♥ A mixture of sour cream & crème fraîche, sweetened & flavored with vanilla, tucked inside (see below), and fresh berries toppled over…

 Or perhaps the yogurt of your choice, and then once again berries on top…

♥ Or even sliced bananas tucked inside and then a good dollop of cinnamon-scented whipped cream…and even an extra drizzle of chocolate…

 You might decide to roll them instead of folding them like hankies…

 You can dust the finished crêpes with either dark chocolate or confectioners sugar…or both…

For a dessert:

 Maybe you’d like to macerate your berries in melted raspberry sorbet first – you’ll know what to do with them from there…!

 You might like a softened vanilla ice-cream inside & a rich chocolate sauce dribbling over the edges of your hankies…

ChocolateCrepes-9

NOTE:  Keep in mind that it’s best to prepare these at the very least one hour ahead of cooking. Two hours is better. Overnight, or a full day ahead, is great! This allows the flour molecules to become fully hydrated and the crêpes to become their tenderest.

_________

Chocolate Crêpes

Makes 12 – 8 to 9-inch crêpes

__________

Butter – 1 Tablespoon

Bittersweet Chocolate – 1½ ounces (40 g) – chopped

Milk – 1 cup (250 mL)

Large Eggs – 2 

Sugar – ¼ cup (55 g)

Vanilla Extract – 1 teaspoon

All-Purpose Flour – 1 cup (125 g)

_______

ChocolateCrepes-8

Into a small to medium saucepan place the butter, chocolate and milk and gently heat, stirring occasionally, until the chocolate has melted. Remove from heat.

Using a medium-size bowl, beat the eggs with the sugar. Add the vanilla and then the flour. Now beat in the chocolate milk mixture, slowly at first to eliminate lumps from forming. Pour the mixture into a pitcher or jug.  (If lumps are present, strain into the pitcher.)

Allow to sit for at least one hour. See NOTE above.

Check the consistency of your batter. It should be like a thin cream…add small amounts of milk, mixing thoroughly, until desired consistency is reached.

When it’s time to cook your crêpes, a non-stick skillet (8 – 10″) will work best. But any skillet of this size will work…they will just require a spraying or a buttering/oiling of the pan from time to time. Crêpes are better if they’re drier, but don’t let this stand in your way of a treat!

Heat the oven to 150°F (65°C) and place a plate inside. Place your skillet over medium high and allow it to come to temperature.

(Count on the first one or two crêpes being trials, just as in pancakes.)

Depending on the size of your pan, you’ll only need 1½ to a scant 3 Tablespoons of batter per crêpe. Once your pan has reached temperature, raise it off the heat and drop in the batter, tilting the pan in a circular motion so that it coats the bottom of the pan evenly. Any holes can be filled with a touch of additional batter. When the underside is cooked and the topside is mostly dried (only about 1 minute!) lift one edge with a butter knife, or a skinny spatula (or even your fingers) and flip it to finish the crêpe – 30 seconds or so.

Place them on the heated plate in the oven (covered with foil) as you prepare the others, or serve them as they come out of the pan, as you prefer.ChocolateCrepes-10

These crêpes will freeze well if prepared ahead. Simply place parchment paper or waxed paper squares between them, and then placed in a freezer bag. Allow them to come to room temperature and then gently reheat them in a warm oven. Then fill and prepare as you like.

Read more

Luke

I posed the question to you last spring, where do you find your sunshine? This spring I’ve been asking a similar thing – but this time, a question posed only to myself.

I’m one of those who feels life deeply. At times it seems as though I could burst apart, a sparkling, confetti-ed explosion of  joy; at other times, I fear I may be crushed by the boulder of a weight behind my ribs. My husband says it’s the result of living with an open heart. Maybe, I don’t know, but I do know it’s not in me to do it differently. This Spring our dear golden dog Luke, who we’ve shared home and life with for 13 years, suddenly grew very very old. We’ll lose him soon. He’s been  a true friend, a mind-reader, a leaner, sun-seeker, a soulful soul, a dear and constant companion. We’ve shared so many playful happy times, a deep and mutual affection, and now we share a suffering. This we do, because we love, and suffering and love are bound.

monsieur_luke-1

Read more

pasta that stands out in a crowd

Several years ago, three of us went to a newly-opened restaurant here in Portland by the name of Fin. Great name for a (primarily) fish restaurant, no? One plate after another was brought to us, bearing exquisite-tasting and exotic-looking creations, works of culinary art, in very small portions…each with just a few bites to share. We saw one on this tasting menu using “Squid Ink Pasta” and our eyebrows went up and our eyes grew wide and we looked at each other with question marks across our foreheads that read, “Dare we?” We did! And what a good move that turned out to be!

About a year later, Fin closed its doors…lost its lease, through no fault of its owners…the landlord just wanted another and quite different use for the property. We have so many very good restaurants in Portland, but we were sad to see Fin go.

How I’d like to thank them for first introducing us to this intoxicatingly delicious, love at first bite, pasta. The one thing I know to do is to share the good noodle news with you’s!

This wasn’t the way it was prepared for us the first night we dined at Fin, but I’ve been thinking of preparing it like this for quite some time. And, turns out, it was as good as a very good food dream can be.

ShrimpLemonSquidInkPasta-1

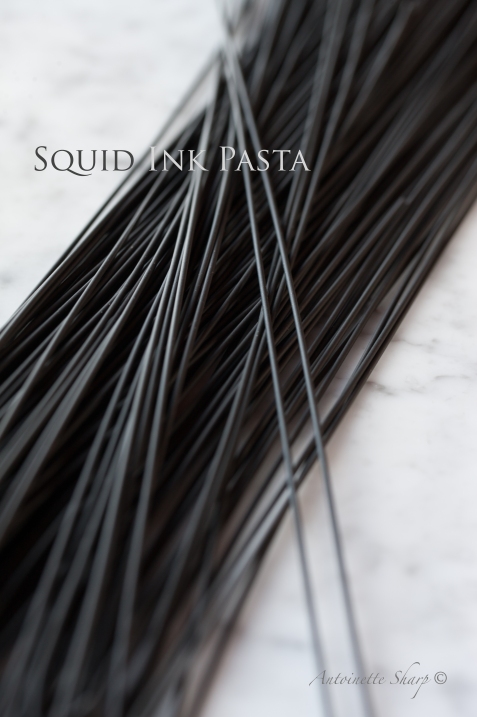
Before we get to the recipe, a word about the pasta. It’s hard to imagine, isn’t it? Pasta as black as winter’s midnight! It still has the tooth-feel of a good spaghetti or fettucini noodle, but with a certain inexplicable velvety silkiness. Don’t think for a minute that I mean slippery like an eel! I mean smooth (and please, when you say it, say it slowly, drawing out those oo’s!) It tastes a bit of the sea, a little briny, but not salty. It will cost you a little more, and it may be hard for some of you to find, depending on your markets nearby, but it’ll be worth the hunt and worth a few extra dollars (only a few!) for a meal…this…this..indescribably good.  (If you have trouble locating the pasta locally, you can order from Amazon. There are several names and sizes to choose from.  Here’s one Italian brand I like a lot –  the  link here.)

ShrimpLemonSquidInkPasta-5

I recently discovered a wonderful article in Cooks Illustrated on how to prepare (perfect, yes I’ll use the word) shrimp under the broiler. Being thus equipped, it was a cinch to put these two together. You’d have done it too…

ShrimpLemonSquidInkPasta-3

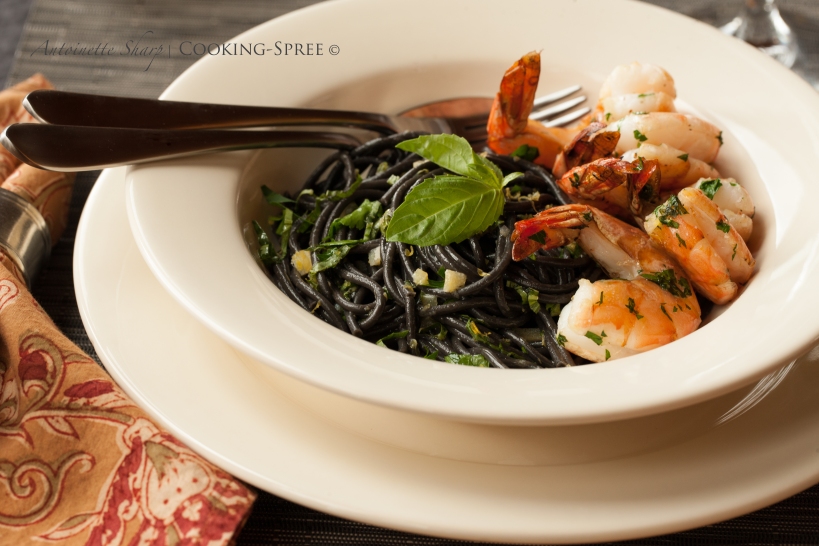
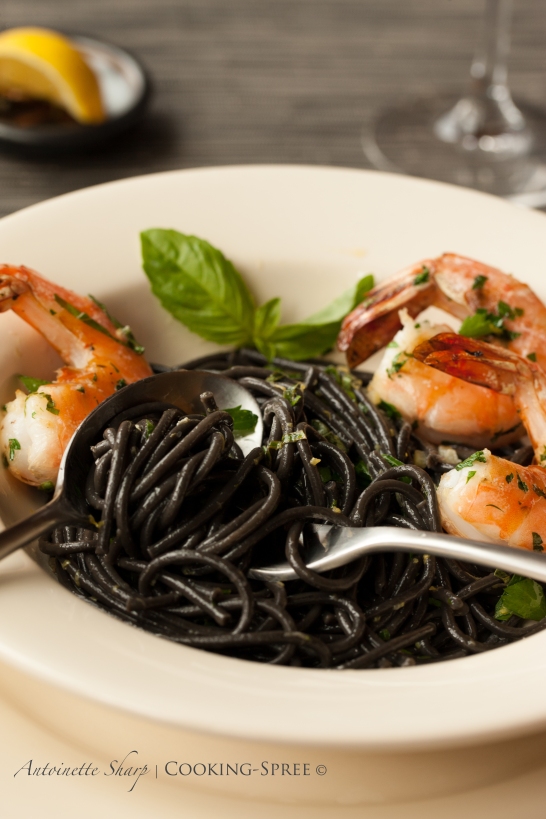
Shrimp & Squid-Ink Pasta with Lemon & Basil

This all comes together pretty quickly…once you get those rascally shrimp clean and deveined. But be sure to leave the shells and tails on…lots of good flavor in those shells, and they share it with the shrimp as they cook. (Though of course you’re permitted to take them off before you eat.) The cleaned & butterflied shrimp are then dropped into a brine for 15 minutes before cooking. That will give you plenty of time to gather the rest of your dinner.

Garlicky Roasted Shrimp

( serves 4 to 6 )

____

Salt – ¼ cup

 Shell-on Jumbo Shrimp – 2 pounds (16-20 per lb)

Unsalted Butter – 4 Tablespoons

Vegetable Oil -¼ cup

Garlic – 6 cloves, minced

Red Pepper Flakes – ½ teaspoon

Black Pepper – ¼ teaspoon

Fresh Parsley – 2 Tablespoons minced

Garnish: Lemon Wedges

_____

Dissolve salt in 1 quart cold water in a large container. (It will take you some long minutes to prepare the shrimp so I wouldn’t add to the brine until you’ve got them all done so they’re all flavored equally.)

Using kitchen shears or a sharp paring knife, cut through the shell and devein but do not remove the shell. Using a paring knife, continue to cut the shrimp ½-inch deep, taking care not to cut in half completely. (See Illustration.)

ShrimpLemonSquidInkPasta-6

Submerge the shrimp in brine, cover, and refrigerate for 15 minutes.

Adjust oven rack 4 inches from broiler element and pre-heat the broiler. Combine melted butter, oil, garlic, pepper flakes, and pepper in a large bowl. Remove shrimp from brine, pat dry with paper towels then add shrimp, along with the parsley, to the butter mixture. Toss well, making sure that the butter mixture gets into the interior of the shrimp. Arrange on a wire rack set into a rimmed baking sheet.

Broil until shrimp are opaque and shells are beginning to brown on the top side, 2 to 4 minutes, rotating sheet halfway through the broiling. Then flip shrimp over and continue to broil until second side is opaque and shells are beginning to brown, another 2 to 4 minutes, rotating halfway through. (Very doubtful this will require anything close to 8 minutes total time!)

ShrimpLemonSquidInkPasta-4

You may think now to plop these beauties onto pasta – and how lucky! That’s the very thing I’m recommending!

____________________________________________

the pasta!

I’ve paired this pasta with a couple herbs and with lemon, three ways – the tart juice, the bright zest, and the Incomparable Preserved Lemon. (You can omit the preserved lemon if you wish, but I don’t know why you would! : ]  If you still haven’t made your own, you can buy them already prepared. In an upcoming Spreenkle I’ll share a quick trick for making a reasonable facsimile much faster in your freezer – or Google it and you’ll see the method. I still prefer the slower method though.)

Squid-Ink Pasta with Lemon & Basil

( serves 4 with shrimp )

__________

Squid-Ink spaghetti, fettucini, linguini, capellini (your choice) – 8 ounces

Juice of 1½ – 2 Lemons

Lemon Zest – from the juiced lemons

Preserved Lemon (the rind only, finely-diced) – from ½ lemon – rinsed well, pulp removed

Unsalted Butter – 3 Tablespoons

Extra-virgin Olive Oil – 3 Tablespoons

White Wine – a good Splash

Basil Leaves – 16 medium to large ones

Italian Parsley – 1½ Tablespoons chopped

Salt – to taste

Freshly-ground Pepper – to taste

________ Read more

butternut squash ravioli with toasted pecans & sage

Many of you are well-acquainted with the Italian gentleman whose handsome head pops up on many pages around this neighborhood. Always nattily dressed in dark suit and narrow tie, always raising his glass and leaving kind words to cheer us. He’s known to us as Chicago John. And he’s a legend in these parts.

You’ll find John cooking up a delicious Italian storm in the Bartolini Kitchen, every Wednesday.  The smells that rise from his oven and bubbling pots will make you hungry. They’ll make you wish you could pop into his kitchen and pull up a chair and spread your napkin and toast the cook and lift your fork and stay long into the night! They might make you wish you’d grown up Italian, with family recipes handed down, and down again to you. For sure they’ll make you wish you could cook like John does. And that’s where this little journey began for me…

SquashRavioli-1

Only a handful of times in my life have I made pasta from scratch. I should be throttled for that! The man I married (who calls himself my grateful guinea pig and is such a good sport) is an enormous fan of pasta. Wrong word choice…he likes pasta, a Lot. So it was that when I spotted John’s series of posts on pasta – and then – Ravioli! – I knew I’d just discovered the Holy Grail – no question about it – this was D.i.n.n.e.r. – written in the Guinea Pig’s own Language of Love.

Now you understand, I’m not the one to learn pasta making from. No, no. I’d head over to John’s if I were you. Below is the recipe for the Bartolini’s pasta dough. It’s the one I used (Naturally!) I followed his expert guidance on how to roll and what dies to use as a novice raviol-ist. I prayed the rosary (ok, not exactly), asked John for one more encouraging word and then I dove right in. Fearless! (ok, not exactly.)

(You’ll be able to view this recipe better if you click on it.)

SquashRavioli-4

It all went quite well, just like John said it would. I had mechanical issues with my pasta roller and I think I’m tossing it (but not til I’ve found a replacement.)

__________

I made a sweet & savory butternut squash filling…

(recipe follows)SquashRavioli-2

Closed those little pillowy parcels up…SquashRavioli-3

Gently boiled them in salted water, drained them and then slid them into a simple sauce of browned butter, garlic & sage, thyme & parsley & toasted pecans. G.P. will probably chime in here and tell you about it, but if he’s still tied up licking fingers, I’ll tell you…

it was pretty fine!

SquashRavioli-12

_____

Butternut Squash Ravioli with Toasted Pecans and Sage

1 butternut squash, about 2 pounds

Vegetable Oil – just a wee bit for brushing squash

 Cayenne Pepper – a Dash

Freshly-grated Nutmeg – (about 5 passes over the grater – to taste)

Salt & Freshly-Ground Black Pepper

Freshly-Grated Parmesan –  ½ cup

dried bread crumbs – ½ cup

_____

Freshly-Made Pasta ala Bartolini (recipe above)

___

Brown Butter with Pecans & Sage

Butter – 4 to 6 Tablespoons, melted

Garlic – 1 medium to large clove

Chopped Fresh Sage Leaves – 2 Tablespoons

Chopped Parsley – 2 Tablespoons (divided)

Chopped Fresh Thyme – 2 teaspoons

Toasted Pecans, ½ cup coarsely chopped

Freshly Grated Parmesan or Pecorino Romano (I prefer the latter here)

Prepare the filling: Preheat the oven to 375°F (190°C) Slice the squash in two, from top to bottom and scoop out the seeds. Brush the cut surface with vegetable oil and place cut-side down on a baking sheet lined with parchment paper or silpat. Bake until soft – about 40 minutes (though begin checking at 30.) Scoop out the flesh and measure 2 cups full. Drop it into a food processor (or mash well with a fork) blending with 2 Tablespoons butter. Season with a dash of cayenne, grated nutmeg, salt and pepper. Season to your own tastes. (It will not need to be fully seasoned with salt since the cheese will bring some of its own.) If the squash seems a bit too liquid-y you can dry it out by dropping it into a skillet on high heat for a few moment. Add bread crumbs and cheese. Set aside.

Read more

Hummus – stuffing our pockets

Hummus was one of the first things I learned to make as a 20-something year old bent on eating well, while not making life difficult on relatives of cows I’d grown to love as a girl. The hummus of those days has morphed a number of times over, as we ourselves tend to do.

Back then I used canned chickpeas. I prefer to cook my own these days, but I’d much rather use canned chickpeas than face the dreadful plight of hummus-lessness when the mood for hummus-in-a-hurry strikes. I’m not at all a fanatic about cooking my own and  always have canned chickpeas on hand. BUT, I do think home-cooked beans are noticably better-textured and flavored and if you want to consider giving it a gohere are some reasons why you might consider it too –

You’ll cook them with no preservatives, no gross amounts of salt in the canning liquid – (though not all canned beans come loaded this way.) You can use some of your own cooking liquid to puree in with the beans. (Much better than plain water.) I won’t use the liquid if they’re canned. A batch of your own fresh-cooked chickpeas is a fraction of the cost of canned. There’s less to throw away (or recycle.) And then, there’s the taste.

One of the changes to my hummus has come about quite recently – only since developing a mad crush on Ottolenghi (I mean, his recipes!) It would seem that the skins of the chickpeas, even when the beans are cooked to softness, retain a bit of their toughness unless measures are taken to further soften them. Ottolenghi adds baking soda to both the soaking water, and then again to the cooking pot. This addition and sufficient cooking time are  probably THE keys to THE creamiest, most velvety hummus your mouth will ever taste. I’d like to compare it to ambrosia’s savory cousin, but having never tasted ambrosia…Anyway…

Another measure which I’ve read about recently – in several places – seems awfully tedious at first. – but perhaps especially in the case when canned beans are used, worth the extra effort. You squeeze each and every little chickpea between thumb and forefinger, easily slipping them out of their filmy skins. This happens all the more easily with the addition of baking soda to the cooking water. (It’s as if they were itching to shed them, and you came along, right place, right time.) What’s left, once these naked beans are pureed with garlic and fresh lemon juice and tahini (the “butter” of sesame seeds”) is exquisitely smooth.

________________

The pita-pocket sandwich is just about whatever you’d like it to be. What I’d like it to be goes something like this:

Home-baked pita, sliced in half. A good slathering of lemony hummus, topped with thinly-sliced tomatoes and English cucumbers (the kind with the very small seeds); perhaps some sprouts or pea-shoots or micro-greens; maybe some delicate leaves of Spring lettuce, or any other lettuce shredded; perhaps some shredded carrot; a little feta; thin slices of red onion; perhaps some marinated & grilled kabobs of fish or chicken (or you decide); definitely some Greek-style yogurt or tzatziki. And maybe an extra drizzle of olive oil. And because each half is fairly small and because life comes with SO many choices, and choosing is sometimes very hard, make them every which way.

PitaHummus-3

But DO start with the hummus:

PitaHummus-2

The Hummus

_______

1¼ cups dried chickpeas, soaked in cold water overnight (See NOTE)

1½ teaspoon bicarbonate of soda (baking soda)

Juice of 2 to 2½ lemons, or to taste

2 or 3 cloves garlic, crushed

salt to taste

4 – 5 Tablespoons tahini (sesame paste)

a pinch (or several) of ground cumin

extra virgin olive oil

_____

OPTIONAL: see below for optional garnishes & serving suggestions

Hummus becomes a personal thing over the years. You find what you like – more garlicky or lemony, or less? – more tahini, less tahini? – more herbs or none at all? It pays to taste a little as you go. Taste your tahini before you start. Is it bitter? Then go with far less than what’s shown above. (I ruined a batch once with tahini far different than what I was used to.) Add most of the lemon and 2 cloves of garlic to start. It won’t be the right consistency yet, but Taste. If it’s tasting about right, don’t add the rest until closer to the end if at all. You’ll develop your own perfect proportions. With that out of the way, here’s the method –

NOTE: 1¼ cups dried chickpeas will equal about 3¾ cups cooked – if you use canned chickpeas you can give them a little extra cooking time in fresh water to soften them further, and then if you like, remove the skins from them as well.

_____

Read more

on pita & filling our pockets

Making your own pocket bread may not be the thing for you. Do you have some leisure hours on one of your weekend days that you might like to spend playing with soft little pillows of dough? Do you find it a thing of pleasure to create something from scratch, something you can easily grab off the shelf, machine-made and already shrink-wrapped for you in plastic? Would it thrill you (just a tiny bit?) to watch flat pancakes fill like hot-air balloons in your oven while the aromas of a bakery fill your house?   hmmm! – well –

then…

PitaBread-5

Pita  – from your own oven

_____

makes 16 pita pockets

___________

1 Tablespoon active dry yeast (or 1 package)

2½ cups lukewarm water

¼ teaspoon sugar

Approximately 6 cups unbleached white bread flour  (or unbleached all-purpose flour)

1½ – 2 teaspoons salt

3 Tablespoons vegetable or extra-virgin olive oil

__________

 Into a large bowl, pour ½ cup of warm water and stir in the yeast to dissolve. Add the sugar. When the mixture begins to froth (proving that the yeast is still lively) stir in the remaining 2 cups of water. Gradually add 3 cups of flour, 1 cup at a time, stirring vigorously. (You may either do this by hand, or with a stand-mixer.) You’ve now made a “sponge”. Allow it to rest for 10 minutes, or until it too froths.

Stir in the salt and 2 Tablespoons of the oil and mix together well. Gradually add the remaining flouryou may need less than the total amount specified – once you have a dough that holds together into a ball and isn’t sticking wetly to your hands, you’ve added enough flour.

(Because the flour hydrates gradually – and depends on ambient humidity amongst other things – if you add large amounts of flour all at once, you can overshoot the mark. All would not be lost…just add a bit more water – gradually – to find that happy balance.)  

Knead well by hand in the bowl, or on a floured board, ten minutes or so; or in a stand mixer using the dough hook for maybe 7 minutes. You’re looking for a smooth, shiny and elastic dough that no longer sticks to your fingers when held for several seconds. Dust with a bit more flour occasionally if it proves too sticky. Form it into a ball.

Put the remaining tablespoon of oil into the bowl and roll the ball of dough around so as to grease it all over. (This prevents a crust from forming on it.) Cover the bowl with plastic wrap and leave in a comfy warm place free of drafts for about 2 hours, until doubled in bulk.

Preheat the oven to 500°F (260°C), placing a large baking sheet in the hottest part. (Generally about ¼ of the way up from the bottom.) Allow it to preheat for 20 minutes.

Punch the dough down and then knead again for several minutes. Divide the dough in half. Divide the first half into 8 “equal” lumps and roll these into balls.

PitaBread-1PitaBread-2

PitaBread-3

On a lightly floured surface, using either your hands or a rolling pin dusted with flour, flatten each lump into a “pancake” about 7 or 8 inches across and 1/8 to ¼-inch thick.  Spread a kitchen towel on your counter and sprinkle it with flour. Dust each of the rounds with flour and arrange on the cloth, leaving an inch between them.  Cover these with another flour-dusted cloth and allow them to rest for 20 minutes at room temperature. (If your counter is particularly cold, you could leave them to rest them slightly longer.)

________

Read more

spreenkle #8 – (on pesticides)

beautiful fresh vegetables and fruits, their kaleidoscopic colors, their squat,  bulbous, and stringy shapes, and their deep-earthed or floral scents, make me woozy. extolling their many virtues, urging you to eat them, treading that fine line between encouragement and pushiness, i try not to sound too much like your mother ….

but I’ve sworn to tell the truth, and the complete story is not all health & happiness.

fruits and vegetables have their dark side.

unless you grow your own (and even if you do I suppose) those colorful containers of nature’s goodness may be hiding some pretty nasty insect-defenses… yes, poison, people…and as a general principle, and one I recommend, it’s desirable to avoid consuming poisons wherever possible. 😉

Below are two lists. They’re in alphabetical order, so it’s important to note that the top three on the Avoid List don’t reflect the 3 worst offenders. The worst are: SpinachStrawberries – and Celery (in that order.)

The lists aren’t inclusive of all fruits and veggies of course. They’re only meant to identify the ones most apt and least apt to have high pesticide levels. (Results were obtained from a sampling of produce from the across the US.)

12 Foods –  MOST Pestidicdes

  1. Apples
  2. Bell Peppers
  3. Celery
  4. Cherries
  5. Imported Grapes
  6. Nectarines
  7. Peaches
  8. Pears
  9. Potatoes
  10. Red Raspberries
  11. Spinach
  12. Strawberries

Read more