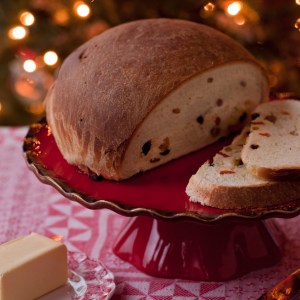
a Christmas bread – Panettone
I caught a little flack from family for sharing the caramel corn. Some thought (kiddingly I’m sure) that it ought to be “sacred,” a family secret, vaulted away. These are NOT stingy people! They’re tremendously generous. Their hearts are huge. But they did have serious qualms about my going public with Ruthie’s caramel corn.
And yet…I’m here to share. So while I’m at it (and already in questionable standing with the family)… here comes another recipe from our holiday house to yours.
This bread is so deliciously fragrant! It’s a soft loaf, delicately but surely flavored with anise, slightly sweet and full of colorful dried fruit. It’s the traditional loaf on Italian tables for Christmas and New Years and has been a tradition in our non-Italian family since I was a kid and our mom first learned to bake homemade bread. You can eat it with just a creamy smear of sweet butter or – as we do – toasted, with its fragrance roused to life again. We’ll have it for breakfast along with our scrambled eggs and fresh-squeezed juice.
I’ve suggested certain fruits to go inside, but really the choice is entirely yours. Mom used to make it with those candied fruits and peels (which, as a kid, I detested and had to go to a lot of trouble to pick out so I could get to the truly good stuff.) I’m saving you the trouble. Use whatever dried fruits you like…cherries, apricots, golden or dark raisins, cranberries or candied citrus rinds or softer nuts like walnuts or pecans. Traditionally, it’s one half raisins and one half other mixed fruits, but you can do all raisins if you like, or none at all. Be sure though not to skimp on the anise (neither the extract nor the seeds) because that’s where all the heady perfume comes from! Can you stand being adored? Then you will be so glad you made this bread!
Panettone – Christmas Bread
- 2 Tablespoons yeast (or two packets)
- ¼ cup lukewarm water (100-110°F)
- 3/4 cup boiling water
- ½ cup unsalted butter
- ½ cup sugar
- 2 teaspoons salt
- 4 large eggs
- ¾ teaspoon anise extract
- 2 teaspoons crushed anise seed
- 6 to 6½ cups all-purpose flour or bread flour (total weight 30 ounces – or 1 pound, 14 ounces)
- 2 cups dried fruit (1 cup golden or dark raisins plus 1 cup total of a variety – dried cherries, dried apricots, cranberries, dried pineapple, candied citrus rinds or soft nuts like walnuts or pecans)
My personal choice – 1 cup raisins (¾ golden, ¼ dark), and 1 cup equally divided between apricots, tart cherries and dried bing cherries. If I had on hand a bit of candied orange rind, I’d add it too, but I don’t always.

Dissolve the yeast in ¼ cup of lukewarm water. (Don’t exceed 115°F. If you don’t have a thermometer, the elbow is a good indicator of the right temp. It’s baby bathwater warm.) Set aside.
Place the butter, sugar and salt in a medium size bowl and pour boiling water over top. Stir to melt and dissolve, then set aside to cool. (Again, no warmer than luke warm.) Once it’s cooled, add the eggs, anise extract and crushed anise seeds. (You can use mortar and pestle to crush…they don’t need to be ground.) If you’ve got a stand mixer than can knead your bread for you, hooray! Transfer these wet ingredients to the bowl of your mixer.
Measure out 6 cups of flour. Have another ½ cup standing by in case you need it. Gradually add the flour to the liquid and knead with dough hook attachment for about 7 or 8 minutes (or longer if required to achieve proper consistency.) You’re looking for most of the dough to be pulled away from the sides of the bowl. When you press the dough with a finger, the dough bounces back at you. And when you lightly squeeze it between your fingers, it almost wants to stick but you’re able to ply your fingers from it without taking dough with. The surface is smooth and baby’s bottom soft.
Lightly butter the inside of a large bowl. Form the dough into a ball, place inside the bowl, and roll around the sides of the bowl to very lightly coat with butter. Cover with plastic wrap. Place in a warm, draft-free place to rise for 1 hour. (My preferred place is inside a cold oven. I place another bowl inside the oven filled with hot water. It creates just the right environment, rising the dough but not too quickly. It should be doubled in about 1 hour.)

While the dough is rising, place the raisins in a bowl and cover with boiling water. Allow to sit for 30 minutes and plump up a bit. Drain them in a collander and then place them on a clean towel, patting to dry.

Cut the fruits into approximately raisin-size pieces. Mix all the fruits together.
Once dough has doubled, remove the plastic wrap, and with your fist, deflate the mound. One gentle punch or two will do.
 Lay the dough out fairly flat; pile the fruits on top. Roll the dough around the fruit and gently knead, incorporating the fruit. Gather into a rough ball, then tuck the sides of the dough under until you’ve again achieved a smooth, round ball. Place it back inside the bowl to rise as before, a second time. Allow to rise until double, about an hour or so. (This may take a bit longer with the heavy fruit now inside.)
Once doubled the 2nd time, split dough in two fairly equal pieces. Allow to rest for 5 minutes under a towel.
Forming the Loaves: The object is to stretch the top, tucking the sides down and to the bottom of the loaf. Do this with the dough held in both hands, thumbs more or less on top, your other fingers continually curving over the sides, tucking the sides down and under. If that’s something you don’t feel confident about, not to worry. However you make a round loaf will be good. Put each loaf onto its own baking sheet or into individual cake pans. (You’ll want to put them side by side in the oven. If you put them both on the same baking sheet, they could rise to meet each other and meld their sides together. That wouldn’t be a catastrophe but you’ll be happier if they don’t.)

15 minutes before you expect the loaves to be ready for baking, place a rack 1/3 up from the bottom of the oven and preheat to 350°F. Brush the loaves gently with melted butter using a pastry brush.
Bake for approximately 45 minutes. If they begin to brown too much, lay a large paper grocery bag over the top toward the end. (Don’t worry, it won’t catch fire.) Or use aluminum foil if you’re leery.
Remove loaves from oven; cool completely on a rack before cutting. This bread keeps well for days, if wrapped tightly. Or bake ahead and freeze (double-bagged) for weeks or longer. Be sure to bring out before the holiday!

~ ~ ~
Tomorrow, continuing to be inspired by our travels to the southwest,
I’ll share yet another recipe with corn as the centerpiece
and some more photos from our trip.


There you go. Rebellious in your generosity yet again. Thanks for the recipe and the beautiful photos. I do love that one with the old timey cup, marble, brown eggs and earthen bowls. So timeless.
What a lovely Christmas bread!
Your post caught my eye. Over the summer, I read Under the Tuscan Sun, and the author is trying to get one of her Italian friends to teach her how to make panettone. They say she’s crazy. Why all the hard work when there are plenty in the stores, lol. Thanks for sharing! ~Ruth
If I were in Tuscany (oh, that I were!) I’d likely give my business to that flour-dusted, tenor-singing baker too! 🙂
Oh.. I love panetonne and never thought to make it:) And about that caramel corn.. I don’t remember seeing that post? 😉
Oh Smidge, I knew I could count on you!
😉 always on your side…
Yes, your photographs continue to be such a delight to the eye. Beyond that, as I read your posts and come face to face with the reality of all the painstaking work involved–the time spent making the actual recipe, then carefully composing the artwork which adorns your posts, and–not least–taking the time to convey not only how to make these sometimes semi-complex productions but doing so in a fresh and lively way which endears you to all who read them, I’m way beyond “impressed”. A totally heartfelt “Thank you!”
You’re so welcome, Joe! Thank you for leaving such thoughtful words!
I have tasted the commercially prepared version and must admit that it never was one of my favorites. But your recipe looks so inviting that I may have to give it another try!
Ronnie
Oh this looks so delicious and thanks for sharing the caramel corn recipe ha ha!
Wow! This looks so good! Thanks for sharing. 🙂
One of my very favorite holiday treats of all time!
Nicely done Spree!
I’ve never eaten caramel corn like Ruth’s. No wonder the family wanted it guarded. I’m really happy it showed up here, but I must say I agree with THEM.
And this panettone! They should be guarding that recipe, too! The way the anise is gently infused into each bite drives me crazy. Nothing like the store bought variety. I keep cutting off another and another piece, gently toasting and adding a schmear of butter… 🙂 and another…
Joseph is right…there is so much love on this table!